Before you upload a new image
Make sure you aren't uploading a duplicate image! Have a look in the relevant Category:Image Categories to see if the image you are planning on uploading already exists on the DJBWiki. The Wiki Staff does their best to identify and remove duplicate files, but it is better that they not be uploaded in the first place.
Uploading a new image
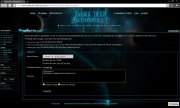 Upload file dialogue.
There are two main ways to upload a new image; either create a link on the intended page ([[Image:example.jpg]]) and clicking the red link or clicking Upload file in the toolbox on the left of any page.
Either of these methods will take you to the "upload file dialogue" which presents you with three sections.
- The first section, Source filename is where you choose the image you want to upload. Clicking on Browse will allow you to choose the image you wish to upload from your computer.
- The second section, Destination filename, is the name the file will be uploaded as.
- The third section, Summary, is where you add the fairuse tag and image category.
Categorizing images
 Muz Ashen, 24 ABY
Make sure you include all categories that an image belongs to, for instance the image on the right belongs to three different categories:
Categorizing images helps keep the many images on the DJBWiki organised and helps the Staff in maintenance and audits.
The fairuse tag
All images should include the fairuse tag by writing {{Fairuse}}. If you know the URL to where the image was originally located you should include that by typing {{Fairuse|http://www.example.com/image.jpg}}.
Using images in articles
To add an image to a page, simply enter this wikicode: [[Image:Imagename]] (where "Imagename" is the name of the image you want to add). If you want the image placed inside a "box", simply type [[Image:Imagename|thumb]]. "Thumbs" are generally most used in articles, because they look neat and orderly.
Now, maybe the image you uploaded was a bit too big. To fix this, simply enter [[Image:Imagename|thumb|100px]]. The image is resized to be 100 pixels wide. You can experiment with different size by adding any number in front of the "px" bit in the wikicode.
To move an image to either side of an article, simply use this wikicode: [[Image:Imagename|thumb|left]]. You can see an example of this to the left of this text.
To add a caption to an image thumb, use this code: [[Image:Imagename|thumb|This is where your caption goes.]]