
|
I may never come back, and I just want someone to know. This article contains text from a former Shadow Academy course. It is no longer in use, and is preserved here for historical purposes only and should not be used/referenced.
|
Introduction
Stop crying like a baby; sit up straight; get your finger out of your nose; and pay attention. I'm Darth Awesome and this is where I'll train you to code like a Jedi.
Hyper Text Markup Language (HTML) is not a programming language, but rather a markup language. HTML has been around for a few decades; is easy to get the hang of; does not taste like chicken; and is a large part of delivering web page content to browsers! Just because it is easy to wrap your head around, however, does not mean it should be taken lightly or attacked sloppily. This course is meant to smack you around a bit and make sure you do what you are supposed to so that you don't break the Internet or accidentally kill a few puppies by the HTML Gods wreaking vengeance due to your mismatched tags.
Upon successful completion of this course, you should be able to add HTML to your reports and/or news articles without the SCL breathing down your neck about screwing up the front page of the DJB. And if the mood hits you, you could even code a basic and functional web page that meets current HTML standards! HUZZAH!

History of HTML (if you care)
If you are a mental masochist or some sort of coding historian, you can read up on the history of HTML here and get some more general information that you may find useful.
HTML Editing
Creating HTML code is done by opening up an editor and smacking whatever you use for typing (fingers for most of us, toes for some, and other unmentionables for a select few) against a keyboard in some fashion or another with liberal uses of "<" and ">". The editor is an important aspect of coding HTML and is largely fueled by the preference of the coder. Before I give you some suggestions on what to use, however, I will give you this important piece of advice:
DO NOT USE MS WORD TO CREATE YOUR HTML. If you do this, I will locate your closest relative and kick them in the privates 72 times.
Instead, be a smart person (a.k.a. non-coder-douche) and use a tool that is appropriate:
- Notepad (In all honesty, don't use this. You will thank me later.)
- EditPlus (PC Only)
- TextWrangler (Mac Only)
For this course - since learning and understanding HTML is driven by hand writing the code yourself - DO NOT use an editor that generates the HTML for you. If you do and that is discovered, you will fail this course.
Words To Memorize
Before we go crazy coding HTML like a mad-man (mad-woman?), there are a few terms that you need to be familiar with because they'll be used throughout this course:
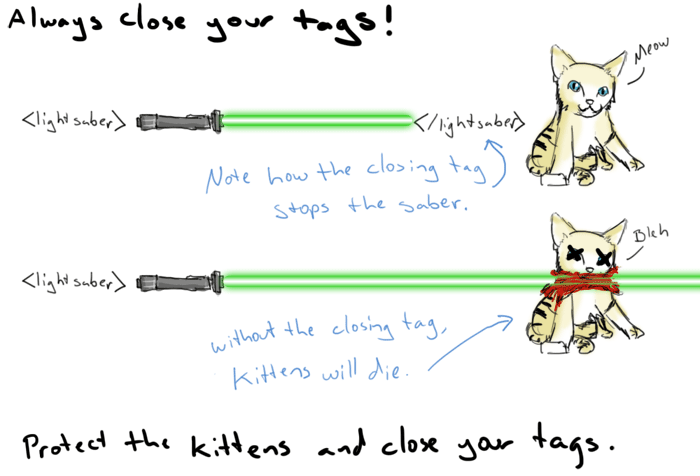
Tag: Used to specify "mark-up" regions of HTML documents for the web browser (IE, Firefox, Chrome, etc) to interpret. Tags look like:

Element: An element is a tag that is fully closed (a.k.a. completed). A tag with a "/" at the beginning indicates a closing tag. A tag (as mentioned in the previous picture) with a "/" at the end is a self contained tag that is still considered to be closed if the slash is present (Note: there are only a few elements that are self-contained: <br />, <link />, <hr />, etc). Closing tags is extremely important.
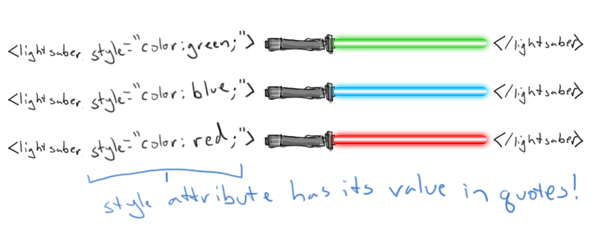
Attribute: Used to modify the value of HTML elements. Elements will often have multiple attributes. An example attribute is the style="color:blue;" in (note that the values of attributes should always be quoted):
HTML Document Structure
Having a bunch of tags is neat, but not overly useful unless you organize them in a meaningful way. I'll show you how to build a basic page step by step:
The <html> Element
<html> begins and ends every web page. Its purpose is to contain all your HTML to describe your web page to the web browser. Without the appropriate structure, the browser is all "WTF?" You need to make sure to have a corresponding closing tag at the bottom like so:
<html>
</html>
The <head> Element
The next element that is needed is the <head>. Tags placed within <head> are not directly displayed by web browsers. This is where we place things like the <title> tag, CSS (if we are awesome), and JavaScript (if we are flipping insanely ballsy).
<html>
    <head>
    </head>
</html>
The <title> Element
Put this sucker inside the <head> tag and whatever text is encapsulated within the <title> tag will be displayed at the top of the browser.
<html>
    <head>
        <title>Dead Ewoks</title>
    </head>
</html>

The <body> Element
The <body> element is where all content is displayed: paragraphs, text, pictures of Ewoks doing flips into my lightsaber, etc. We'll be looking at how to add all that stuff later...for now, all you need to know is that the body element will encapsulate all of your content.
<html>
    <head>
        <title>Dead Ewoks</title>
    </head>
    <body>
        Put all your HTML awesomeness in here.
    </body>
</html>
Basic Document Formatting
There are a blastboat load of tags to make your content look the way you want. The best way to learn what they are is to see them in action (and of course, code them up yourself).
Throughout a typical Web Page there are often various sections that need labeling. Those labels (a.k.a. headings) are represented by using heading tags 1-6. (<h1></h1>, <h2></h2>, <h3></h3>, etc) Here they are in action:
<h1>Darth Awesome</h1> looks like:
Darth Awesome
<h2>Really Enjoys</h2> looks like:
Really Enjoys
<h3>Eviscerating</h3> looks like:
Eviscerating
<h4>Cuddly Ewoks</h4> looks like:
Cuddly Ewoks
<h5>With Blazing</h5> looks like:
With Blazing
<h6>Red Lightsabers</h6> looks like:
Red Lightsabers
Paragraphs
You should never barf text all over the place in an unformatted fashion. No sir. You could go ahead and throw line breaks all over the place (using <br/>) but that is a super n00bish move that makes Pa'lowicks cry.
Instead, use paragraph(<p></p>) tags! YAY!
Text Formatting
Here are a lot more ways to format your text:
- <big> denotes big text
- <del> defines deleted text
- <em> denotes emphasized text
- <ins> defines inserted text
- <small> defines small text
- <strong> defines strong text
- <sub> defines subscripted text
- <sup> defines superscripted text
Do NOT use the following tags for formatting as they are deprecated:
- <b> The old bold tag
- <i> The old italic tag
- <font> The old font formatting tag
- <u> The old underline tag
Images
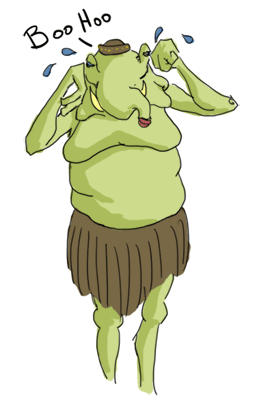
Almost every website needs pictures of a fat Krath with leadership experience.
To add something like that to YOUR website, do this:
<img src="http://www.stfu.org/picture_of_leader.png" alt="Fat Krath"/>
The "img" is the tag that says: "hey, this is an image." The src="" attribute tells the browser where to look for the image. The alt="" tag is very important because it tells search engines a bit about the picture and helps people who can't see (like Miraluka) learn what your image contains via screen readers.
Links
Links allow people viewing web pages to navigate to other portions of your website (or to a new website entirely). To create a link, you do the following:
<a href="http://www.poopingbanthas.org">This is awesome</a>
You may be thinking..."<a>" tag? WTF? Well...yeah...it is a bit weird, but the "a" stands for "anchor." What are you going to do about it?

Lists
When you want to make a list of things (whether ordered or not), you use <ul> if the list is in no particular order or <ol> if the list is an ordered one. Each item in the list is surrounded by an <li> tag. Like...if I wanted to list the animals that turned me on, I would do the following:
<ul>
	<li>Bantha</li>
	<li>Dewback</li>
	<li>Ronto</li>
	<li>Princess Leia</li>
</ul>
If I wanted to list the animals I had actually cuddled with in a specific order, I would do the following:
<ol>
	<li>Ronto</li>
	<li>Bantha</li>
	<li>Princess Leia</li>
	<li>Dewback</li>
</ol>

Making Your Documents Look Sexy
The last piece of the puzzle is making your document look super sexy with some formatting! ANY tag can be styled. The <html> tag, the <body> tag, <p> tags, <em> tags, whatever. To add styles to a tag, simply add the style="" attribute with some formatting code (called Cascading Style Sheets...or...CSS). Here's some basic formatting options:
color: red;
background-color: black;
border-bottom: 1px solid white;
When you throw those styles in the style="" attribute on a tag, you string them all on one line. Like so:
<body style="background-color: black; color: yellow;">

</body>
If you want to do some more intense styling, you can put a <style> tag in the <head> and add styles to elements. Like so:
<style>
	body{
		background-color: black;
		color: yellow;
	}

	a{
		border-bottom: 1px dotted orange;
		color: white;
		text-decoration: none;
	}
</style>
To learn what is possible with CSS, check out http://www.w3schools.com/css/css_reference.asp and get creative.
Nesting Your Elements
Before we get rolling, however, I want to mention nesting. It is VERY important that as you open/close your HTML elements in order. There are times when more then one tag will be affecting the same text at the same time. For example, if you wanted to make a text bold and italic, you would use two different tags (<strong> and <em>):
<strong><em>This is Bold and Italic Text</em></strong>
In this example, notice how <strong> was opened first, but closed last. This is the correct way to write your HTML tags. Note: nesting improperly will unleash the anger of the HTML Gods and/or the Seneschal.
Testing Things Out On Your Own
It is neat to read about HTML, but you aren't going to be Jedi-quality-good unless you try things out on your own. Open up that Text Editor of your choice and create an HTML document then save it as *my_backpack_has_jets.html* on your desktop. Now go look for it on your desktop and open it up in a web browser (double clicking should suffice). If you want a basic shell you can work from, feel free to use this:
<html>
<head>
  <title>My Backpack Has Jets</title>
  <style>
    body{
      background: #000;
      color: #eee;
    }

    a{
      color: yellow;
      text-decoration: none;
    }

    a:hover{
      text-decoration: underline;
    }

    h1{
      color: #FF0000;
    }
  </style>
</head>
<body>
  <h1>I'm Boba Fett</h1>
  <p>
    I bounty hunt for Jabba the Hutt to finance my 'vette.
  </p>
  <p>
    Oh, I:
    <ul>
      <li>Chill in <strong>deep space</strong></li>
      <li>Have a mask over my face</li>
    </ul>
  </p>
  <img src="URL_TO_IMAGE" alt="Awesome Image"/>
</body>
</html>
Obviously, you would replace URL_TO_IMAGE with an actual URL (e.g. https://www.darkjedibrotherhood.com/system/assets/assets/000/000/170/original/html_muz.png)
Using Your HTML Skillz In The DJB
Now that you have the basics down and you've tested things out for yourself, you are prepared to start using HTML in various places in the DJB! You can use HTML in your reports, your news posts, etc...though it is important to know a few things:
- Close your tags! Unclosed tags wreak havoc on the DJB site (or any site for that matter)
- Avoid the heavy use of <br> tags. They are handy, but overall they are bad form. Wrap text in
tags instead.
- If you are copy and pasting text from MS Word (or an equivalent), be sure to fix the quotes! By default, Word Processors turn single and double quotes to "pretty versions" that don't play well on the DJB site. Before copying/pasting the text into the DJB site, copy/paste it into a text editor like TextWrangler or EditPlus; do a search and replace on the quotes; THEN paste it into the DJB.
References
With this course, you've learned the very basics of HTML. There are several resources available to you for writing HTML.
- Tizag - This site has an AWESOME HTML tutorial. Check this out and you'll get chicks (or dudes...whatever you are in to).
- W3Schools - the W3C presents a basic listing of tags and the proper usage in a document.