The printable version is no longer supported and may have rendering errors. Please update your browser bookmarks and please use the default browser print function instead.
This Member Possessions page outlines how members go about managing their items in the possessions system, including renaming, assigning item aspects, filling slots as well as creating and managing loadouts where items are equipped. The possessions management screen is intended as a place to personalize and shape your possessions to your specific character, as well as put together kits of items to use in interactions throughout other Dark Jedi Brotherhood systems. What level of customization exists for each item, as well as the specific means of putting together kits in a loadout are balanced by the Regent, in an attempt to standardize and enhance the member experience for the entire Brotherhood.
Possessions
The default tab on the possessions management screen, this will list all items that a member owns, as well as a means to manage or rename each specific item and tailor it to their character if they wish. This is accessed by going to a member's Administration screen, then finding the Your Character section and clicking on Manage your Possessions. This allows a member a range of tools to manage the items that they own.
- Displaying items: This provides information on how many items are currently displayed and an idea of how many items meet the specific query on a member's inventory. By default when entering a member's inventory it will list the first 25 items by price, and note how many total exist with page and navigation options to the right to move through these items.
- Filter: Expanded by clicking on the small funnel icon, this allow someone to reduce the number of items displayed in the item list of their inventory to specifically show only results that meet the query. The inventory list can be filtered by text in the name, type, category, size, value, and rarity depending on what a specific member is looking for. Left blank will show a member's entire inventory.
- Item: This will list the name of an item, either the original name or unique name if renamed by a member. Clicking on this link will bring up the details of the specific item instance owned by a member. Hovering over this item name will provide a tooltip with more information on the specific item without the need to click through.
- Sell: If an item can be sold, a small gray box will show up next to the item in the list. Clicking the button will expand a list of all stores that are willing to purchase that specific item and how many credits it can be sold for. If an item is still within the sellback period of one hour, the additional language sellback will appear as well to show that clicking would reverse the earlier transaction. If sold the inventory line will turn green noting a successful sale, and reserve period of one (1) hour to go to that store and reverse the transaction.
- Rename: Clicking the rename button will bring up a screen allowing a member to give their item a unique name. There is no approval process required, but inappropriate names are subject to Chamber of Justice attention and will be removed with varying levels of disciplinary action for repeat offenses. If a member is unsure if a name is appropriate they can check with their appropriate Clan leadership. After renaming an item a member will be sent to the management page for a specific item with a confirmation of the change.
- Manage:The manage button will bring up the specific item with various means to manage that item. For members this is the assigning or unassigning of Item Aspects into available slots.
Loadouts
The loadouts tab on the possessions management screen will give a member a means to create a blank loadout and equip owned items into the available slots putting together a kit. These kits find use and apply to various other Dark Jedi Brotherhood systems. This is accessed by going to a member's Administration screen, then finding the Your Character section and clicking on Manage your Possessions, then clicking the Loadouts tab. This allows a member to create a range of loadouts from the items they own. These loadouts are intended to be created for a range of different activities and serve as a tool to help with storytelling and enjoyment in activities across the Dark Jedi Brotherhood.
- Displaying: This provides information on how many loadouts a member has created.
- Filter: Expanded by clicking on the small funnel icon, this allow someone to reduce the number of items displayed in the item list of loadouts to specifically show only results that meet the query. The loadout list can only be filtered by name.
- Create Loadout: This will pop up a box to assign a required name, and then will create a new blank loadout with that name for further management.
- Display: A brief view of the loadout will be displayed, along with the small icon of each item slotted into various spots. The name will be shown at the top next to an icon with an "i" on it that will pop up the loadout description set to further define the unique application of that loadout to a character.
- Remove:Clicking this will delete and remove a loadout.
- Snapshot:This is not currently implemented.
- Manage:This will bring up the ability to manage what is equipped into each slot, and set the loadout description. For each empty slot, clicking on it will bring up a list of all items that can be equipped into it, its size, and a convenient link to navigate to more items that would fit into that slot. Clicking equip will equip an item to the slot. Clicking on the red X on an item that is equipped will remove it. Clicking on an equipped item itself will bring up specific details for that item. If an item takes up more than 1 slot, it will show as grayed out in the second slot it occupies. Loadout details allow a member to edit the name of a loadout, or provide a text-based explanation of how a specific member equips or uses the items in a loadout, as a connection between a member and their equipment, versus just a set of equipment.
- Item:
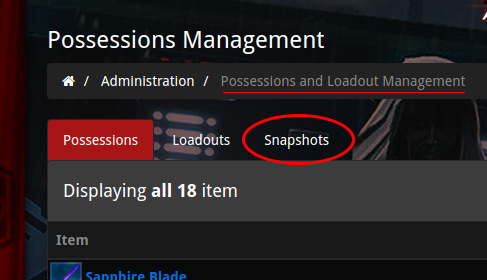
Snapshots Guide
The following steps will show you how to create a manual snapshot.
Step 1:
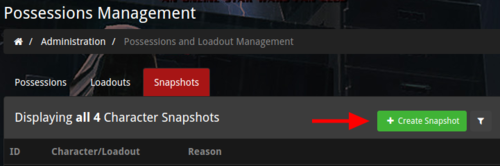
Step 2:
Step 3:
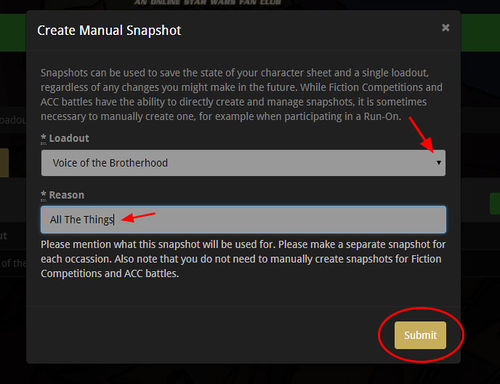
Step 4:
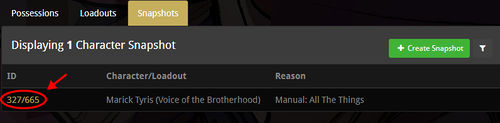
Step 5:
Equipment Slots
There are nineteen (19) total slots that members can equip items into. Depending on the size an item will take up more than one (1) of these slots. In whole, this is the set of equipment that a member can carry with them into a variety of situations. These slots are balanced by the Regent for member experience along with the salary schedules set so that a member will see incremental growth and improvement of the various items they can bring with them. Although balanced with one set of equipment in mind, as experiences change over time additional sets may make sense depending on the nature of a member's activities.
- CyNet: This slot will accept items of the Cybernetic type. Unique among slots, it specifically defines the level of cybernetic modification to a specific person who has the loadout equipped.
- Tech:This slot is intended as a single slot for members to equip a range of items that have a functional use, and is able to accept items of either the Technology or Combat Enhancement type. Unlike equipment, items equipped here can often have unique combat-related benefits in the Dark Jedi Brotherhood.
- Droid:This slot is intended as a single companion like droid that often accompanies a character when using this loadout and accepts only items of the Droid type.
- Armor: This slot covers the entirety of a set of armor. This includes all specific pieces that go with it, all in one item. All items of the Armor type can be slotted here.
- Back:This slot pairs with armor, to complete what is worn by a member. In addition to the set of armor or clothing, it includes something worn over the back or across the shoulders over the top of armor often adding functionality or form. All items of the Back type can be slotted here.
- Weapon: There are five (5) slots available to members to decide which weapons they would like to carry. All of these are of the Weapon type, but with the specific Character Sheet skill required to use them in parenthesis after the type name.
- Equipment: There are five (5) slots available to members to decide which equipment they would like to carry. These slots will accept items of either the Equipment or Technology type.
- Accessory: There are two (2) slots available to members to equip non-functional but more ceremonial and unique items to show off on their loadout.
- Land:This slot is intended as a single land vehicle that a member would use with the specific loadout, and accepts any item of the Land Vehicle type.
- Space:This slot is intended as a single space vehicle that a member would use with the specific loadout, and accepts any item of the Space Vehicle type.
Application
Setup to be as intuitive and user-friendly as possible to achieve customization, the member possessions is a vital part of the system to allow members to interact and manage the things that they own. The options and level of customization vary greatly from item to item and the quantity and types of items that can be put together into a kit are carefully balanced based on salary levels and average encumbrance. The Regent maintains this customization experience with a goal to enhance the member experience in interacting with the items that are purchased with earned credits.
Creating Custom Item Aspects
To further expand on the cosmetic appearance of your Possessions, members are able to create or select from a list of pre-written Item Aspects. If you're working on your Character Sheet, this is where you can expand on your character's attire.
- 1. Navigate to Administration -> "Your character" -> "Manage your possessions"
 Administration panel.
- 2. Find your Armor or Robes. Click "Manage"
 Manage your possessions item.
- 3. Click: "Assign Aspect."
 Edit item aspect.
- 4. This will allow you to either choose a pre-written aspect, or write your own. If you are writing your own aspect, this will go through a short approval process with the Regent Staff. Once approved, you can go back into Manage Possessions and assign your custom aspect :).
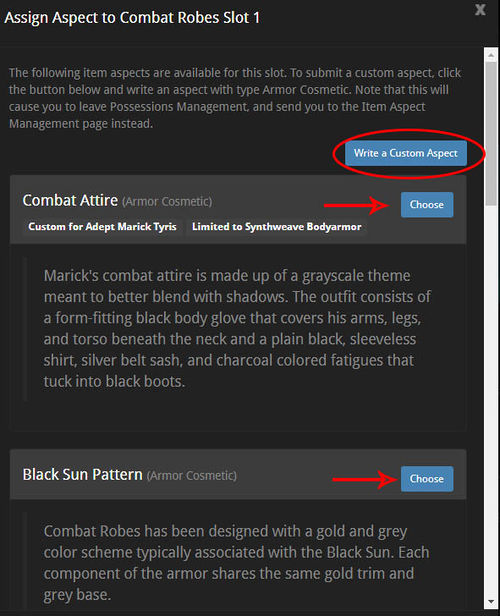 Assign item aspect.
- 5. You now have your characters attire tied to your armor or robes!
 Assigned custom aspect!